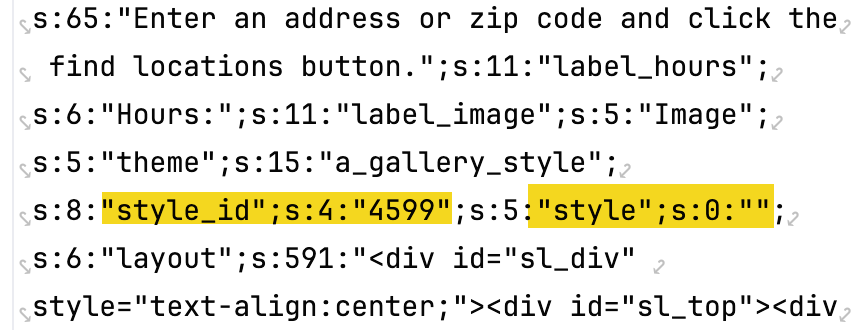
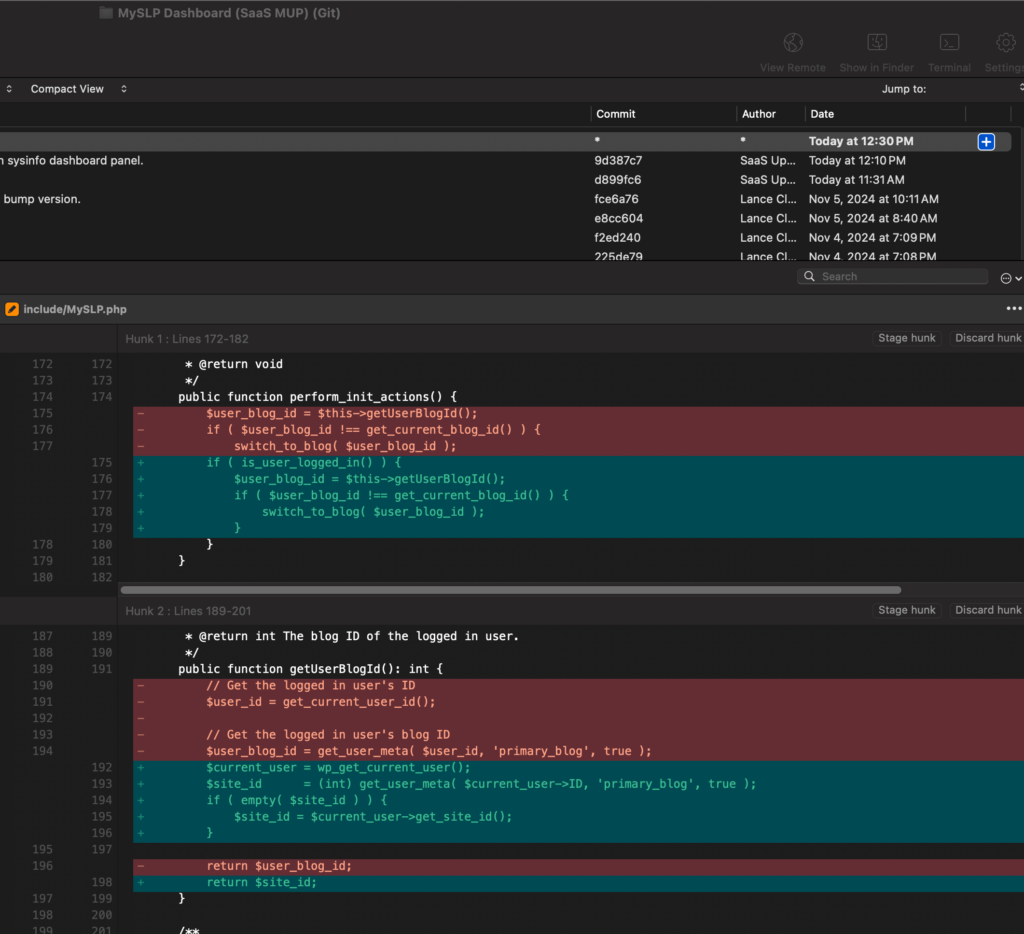
This setting is stored in the options_nojs[‘style’] option setting.
It is managed by an instantiation of the SLP_Settings_style_vision_list object.
- data_field: options_nojs[style]
- label: ‘Locator Style’
- type: ‘style_vision_list’
This is a “smart option” managed by SLP_SmartOptions.
It is defined in \SLP_SmartOptions:view_appearance()
It has a ‘vue’ object type for rendering assistance.
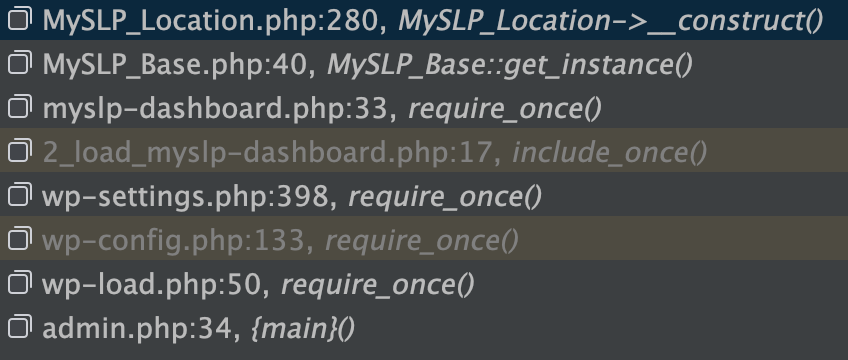
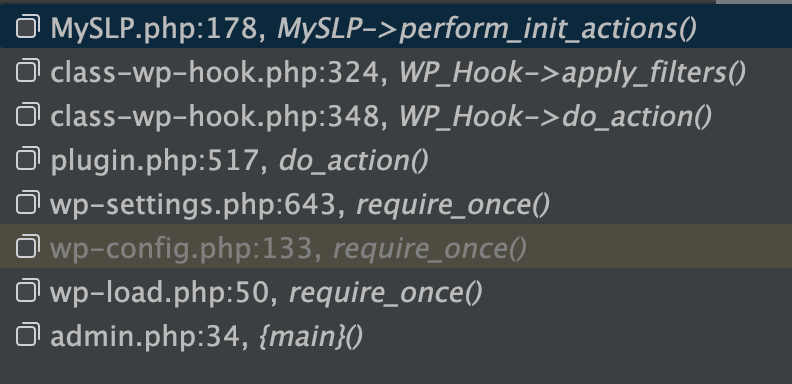
Stack Trace : SLP | Settings
Triggered selecting – Menu : Store Locator Plus® | Settings
Most recent to oldest…
- SLP_Settings_card_list.php:42, SLP_Settings_card_list->display()
- SLP_Settings_Group.php:88, SLP_Settings_Group->display()
- SLP_Settings_Section.php:94, SLP_Settings_Section->display()
- SLP_Settings.php:384, SLP_Settings->render_settings_page()
- SLP_Admin_Settings.php:289, SLP_Admin_Settings->display()
- SLP_Settings.php:384, SLP_Settings->render_settings_page()
- SLP_Settings_Section.php:94, SLP_Settings_Section->display()
- SLP_Settings_Group.php:88, SLP_Settings_Group->display()
- SLP_Settings_style_vision_list.php:15, SLP_Settings_style_vision_list->get_items()
- SLP_Settings_card_list.php:28, SLP_Settings_card_list->at_startup()
- SLP_Setting.php:48, SLP_Setting->initialize()
…- SLP_Admin_Settings.php:213, SLP_Admin_Settings->add_view()
- SLP_Setting.php:48, SLP_Setting->initialize()
- SLP_Settings_card_list.php:28, SLP_Settings_card_list->at_startup()
Showing The Currently Selected Style
\SLP_Settings_card_list::display()
Renders the list of styles.
When $this->value === $item->clean_title it marks it as selected.
$item is from the list of locator styles fetched from the SLP locator style service (see \SLP_Settings_style_vision_list->items below).
In our test case $this->value is EMPTY string “”.
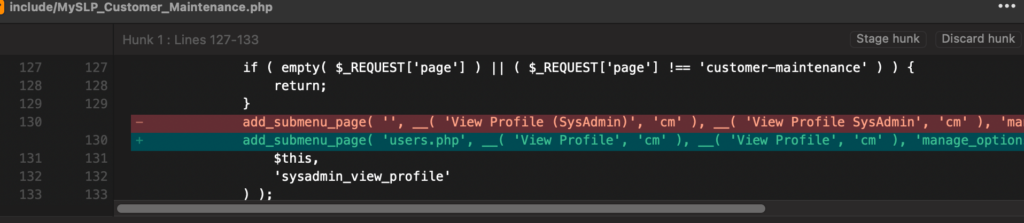
Stack Trace : setting the initial value of the ‘style’ property (option)
\SLP_Setting->set_value() appears to have value already set to “”.
Track down the SLP_SmartOptions and how it loads the default values from options/options_nojs into the Smart Option properties.
- SLP_SmartOptions.php:1784, SLP_SmartOptions->set_valid_option()
- SLP_SmartOptions.php:1832, SLP_SmartOptions->set_valid_options_nojs()
- SLP_SmartOptions.php:1661, array_walk()
- SLP_SmartOptions.php:1661, SLP_SmartOptions->slp_specific_setup()
- SLP_SmartOptions.php:1513, SLP_SmartOptions->initialize_after_plugins_loaded() SLPlus.php:386
- SLPlus->initialize_after_plugins_loaded()
- SLP_SmartOptions.php:1513, SLP_SmartOptions->initialize_after_plugins_loaded() SLPlus.php:386
- SLP_SmartOptions.php:1661, SLP_SmartOptions->slp_specific_setup()
- SLP_SmartOptions.php:1661, array_walk()
- SLP_SmartOptions.php:1832, SLP_SmartOptions->set_valid_options_nojs()
Class : SLP_Setting
Methods
set_value()
Sets the value of a setting.
Fetches the value of a setting from \WPOption_Manager::get_wp_option() if necessary.
Class : SLP_Settings_card_list
Extends SLP_Setting.
SLP_Setting type: “style_vision_list”
Class: SLP_Settings_style_vision_list
Extends SLP_Settings_card_list.
Properties
items : SLP_Setting_item[]
Contains the array of styles retrieved from the SLP Locator Styles service (REST call to external service).
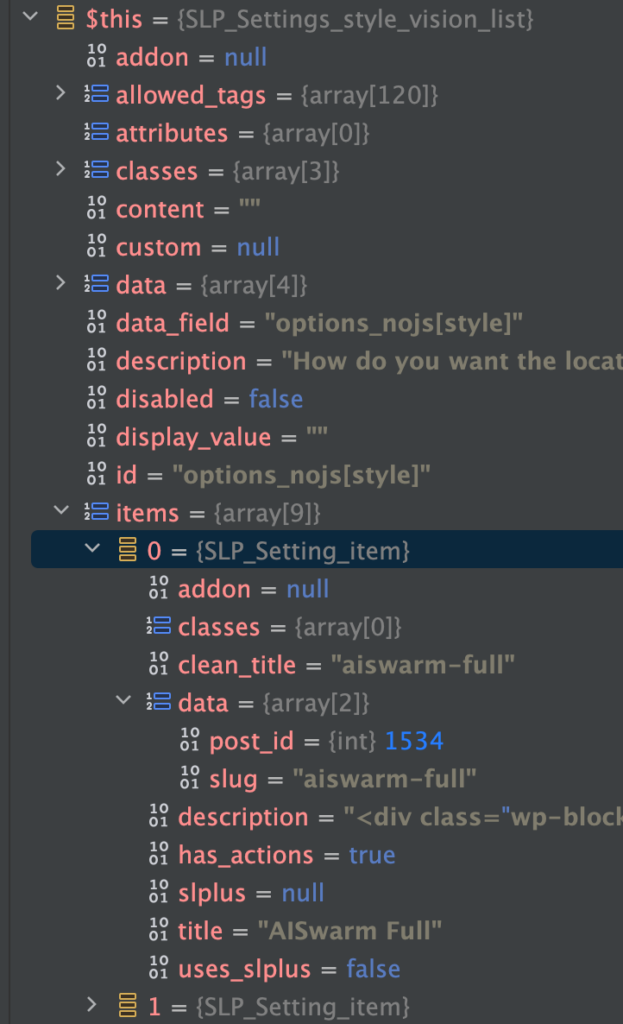
value
Contains the currently set/selected style for the user.