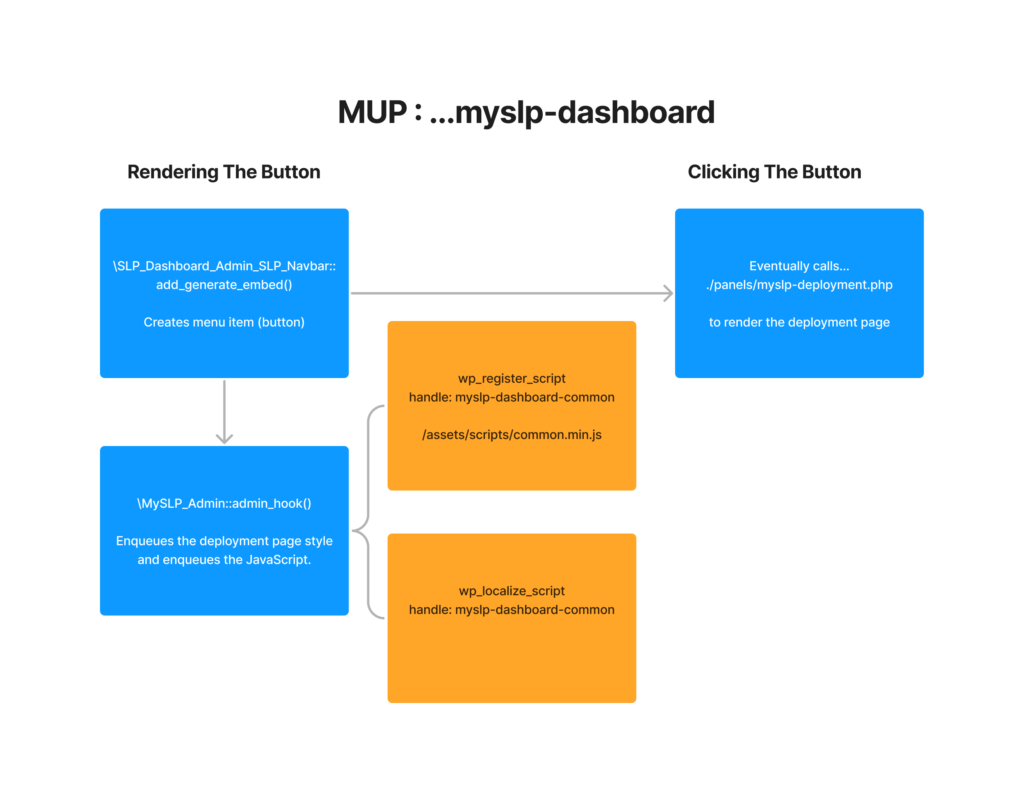
MySLP SaaS : Generate Embed
Store Locator Plus® Internal Docs
SLP Internal Documentation
Development posts.

The production branch. This branch should always point to production releases – the code released to the public or in use on production systems.
The release candidate branch. Prerelease plugins or the plugins/components that are published to dashbeta for the SaaS offering.
The branch being used for testing integration of ongoing development branches.
Starting in August 2022 all product versions will follow a YYMMDD.xx standard where YYMMDD is based on the development start date for primary product releases (Store Locator Plus® for WordPress, MySLP Dashboard,etc.) For related product releases (Power, Front-End, etc.) the date should try to match the main product/service it is related to but this is not a strict rule – rather a suggest to help users easily identify related releases.
The YYMMDD should be 2 digits each and xx should always start at 01 for the first revision. For example 220815.01 is the first iteration for an app that started development on 220815.
The preferred linting library is ESLint due to the ongoing React support.

An excess number of option value lookups was discovered while testing Store Locator Plus® 5.13.8 where the option/label_directions was searched multiple times for a single map render. To reduce load on servers this should only happen once, at the start of the initial map rendering.
This is not a blatant “it did something wrong” or “didn’t do something it should” type of bug. This is a performance and resource usage bug and may require some new architcture.
The manifestation:

The initial search through the plugins reveals places the settings are created, set, stored, and managed but not the “JavaScript hook” being fired via /wp-json (the REST API for WordPress). So we need to look deeper.

Let’s try the start of the REST API path after the generic /wp-json/store-locator-plus/v2/ part…
We can ignore the assets/ directory… but what else is in here…

Ahhh… the slp_core.js call to slplus.rest_url + ‘options/’ + attribute looks sus…a
There was a problem in slp_core.js with value testing.
Turns out an empty value causes multiple REST calls. The following is an invalid test to see if a property exists, which is what we want here. Previously it was checking the value was SET and had a “non-falsy” value. In JavaScript lots of things are “kind of true” or “kind of false” (aka Falsy), for example the empty string “” is FALSE. That is not what we want here.
In slp_core.js we ant to replace the if (!<var>) with if (! var.hasOwnProperty()) …

The call to /v2/options/label_directions was firing once for every location because the default value for the directions label is empty (“”). This was evaluating to false, which forced the SLP JavaScript to query the server to get the value, which set it to “”.
For each location that was rendered the setting was checked… “is the label for directions set?” or more accurately “Is the label for directions set and NOT empty?”. Every time it came back saying “no, it is NOT set” or rather “It IS empty” … so the code would then go ask the REST API server for the label value.
Rinse and repeat.

Adding attributes to the [slplus] shortcode will override default settings for the Store Locator Plus® plugin on a per-map basis.
We are investigating a shortcode like this:
[SLPLUS center_map_at=”Laverton Victoria ” append_to_search=”Australia” initial_radius=”1000″]
Some of these properties are not functioning as expected in the upcoming SLP 5.13.X release.
Note: This feature requires the Experience add on to be active.
Running this test on the Docker localhost, adding a shortcode with ONLY the center_map_at setting.
[slplus center_map_at=”Westford MA 01886″]


Adding initial_radius to our testing… requires some setup.
First change the SLP settings under Results to “Initial Search Radius 10” and leave Center Map At at “Charleston SC”.
The results look as expected… one location within 10 miles of Charleston…

And with center_map_at=”Mt Pleasant SC 29464″ initial_radius=”500″ … also looks as expected…

Now with the full shortcode…
[slplus center_map_at=”Mt Pleasant SC 29464″ initial_radius=”500″ append_to_search=”, United States”]
And run find locations…
The , United States is appended and appears to be working normally.

And now activating Power 5.13 and Premier 5.12 alongside Experience 5.12 and SLP 5.13.8…
It all works same as above…
Apparently this bug was fixed along the way.

The User Action : Filtering Locations With Category on the Testing : Location Categories article is not limiting output to only the specified category.
The front end sends a request back to WordPress via AJAX to request a list of locations. Part of that request encodes all of the form field entries, including the category drop down selection, into a query-encoded (key/value pairs with an & delimiter) string that is send in the formData property to the backend.
The category ID is not being parsed and filtered properly.
Via browser developer tools and the network I/O inspector, XHR filter…

HTTP Method: POST
URL: /wp-admin/admin-ajax.php
Request Payload…

You can see the formdata property in the POST body along with the encoded form data including the cat=5 entry. This is where the requests tells the back end to limit results to those that have WordPress category ID #5 attached to the location.
On the back end the AJAX is routed through the Store Locator Plus® base plugin via the standard WordPress hooks and filters. These are setup in the SLP_AJAX class via this add_ajax_hooks method:
    /**
     * Add our AJAX hooks.
     *
     * @uses \SLP_AJAX::slp_delete_location for the AJAX 'slp_delete_location' action
     */
    public function add_ajax_hooks() {

    	// -- priv (WP logged in) and no priv (guest) AJAX calls
        add_action( 'wp_ajax_csl_ajax_search', array( $this, 'csl_ajax_search' ) );
        add_action( 'wp_ajax_nopriv_csl_ajax_search', array( $this, 'csl_ajax_search' ) );

        add_action( 'wp_ajax_csl_ajax_onload', array( $this, 'csl_ajax_onload' ) );
        add_action( 'wp_ajax_nopriv_csl_ajax_onload', array( $this, 'csl_ajax_onload' ) );

	    // -- priv only AJAX calls (WP logged in)
	    add_action( 'wp_ajax_slp_delete_location', array( $this, 'slp_delete_location' ) );
        add_action( 'wp_ajax_slp_change_option', array( $this, 'slp_change_option' ) );
    }
Where the csl_ajax_search eventually finds its way to the find_locations method.
Debugging the find_locations method it looks like the formdata variable coming in via the superglobal $_REQUEST variable is not being set properly.
Looking at the call stack the form data is mishandled causing the & in the query string to be encoded as &, this causes wp_parse_args() to set the property name incorrect as you can see in the debugging screenshot below.

Turns out the wp_kses_post() is too aggressive with the data munging and converts & to & which then throws wp_parse_args() for a loop.
Instead we need to use esc_url_raw() to leave most URL entities intact.

Read the Testing : Location Categories article for background on this feature.
The setting to display the category selector on the front end stopped working. The Power add on is active, but with SLP 5.13.X prerelease the drop down no longer appears.
This is very likely due to escaping of output that is overly aggressive on what it filters out on the front end.
The base plugin renders the map , search form and results on the front end using shortcodes. The [slplus] shortcode renders the entire UX based on a combination of HTML and secondary shortcodes. These secondary shortcodes are parsed by the SLP base plugin to do things like “put the search form here” or “put the results here”. Within each of those custom shortcodes is another set of shortcodes, for example for the search form “put the address input box here” or “put the radius selector here”.
One of those additional shortcodes is provided by the Power add on to “put the category selector drop down here”.
That is not being processed.
This attaches the method for rendering additional SLP search form features. This method is getting called.
public function add_hooks_and_filters()
...
add_filter( 'shortcode_slp_searchelement'   , array( $this , 'process_slp_search_element_shortcode' )   );
This method is not getting called when the [slplus] shortcode is rendered…
public function process_slp_search_element_shortcode( $attributes ) {
The shortcode_slp_searchelement filter is only fired from this piece of code:

Provided by the base plugin, this handles most of the front end initialization and execution.
This line of code is being called to apply filters…
public function create_SearchElement( $attributes, $content = null ) {
$attributes = apply_filters( 'shortcode_slp_searchelement', $attributes );
⚠️ Evaluating the call execution order, the above apply_filters is being called BEFORE the power add on has run the SLP_POWER_UI add_hooks_and_filters() , noted above, to hook onto that filter call.
Here is the call stack when Power add_hooks_and_filters is run…

The call to SLP_BaseClass_Addon->createobject_UserInterface() is fired during the execution of the ‘wp_enqueue_scripts’ action hook as defined in base_class.addon.php in the slp_init() method…
// User Interface?
//
if ( ! empty( $this->userinterface_class_name ) ) {
 add_action( 'wp_enqueue_scripts' , array( $this , 'createobject_UserInterface' ) );
}
Here is the call stack , CALLED FIRST, for creating the search element:

That means do_shortcode() is being called very early —
This is due to a side effect of all the fuckery WordPress Core has been doing to deal with the block mode editor. In order to support new block themes (like Twenty Twenty Two) WP_Block->render() calls render_block_core_post_content() super early. Before any script enqueue.
WP Core: render_block_core_post_content() calls the “the_content” filter way earlier than non-block themes:
$content = apply_filters( 'the_content', str_replace( ']]>', ']]>', $content ) );
Lance.bio : WP Hooks & Filters Reference
With the block theme, firing that method via the ‘wp_enqueue_scripts’ method is too late for WP Block Themes.
There are multiple methods that could be used to hook this, but which one will be BEFORE the WP Block rendering calls the ‘the_content’ filter AND still work for older themes?
Replace
// User Interface?
//
if ( ! empty( $this->userinterface_class_name ) ) {  add_action( 'wp_enqueue_scripts' , array( $this , 'createobject_UserInterface' ) ); }
With the call order weight parameter added (the default WP action weight is 10 if not specified)
// User Interface?
//
if ( ! empty( $this->userinterface_class_name ) ) { add_action( 'the_content' , array( $this , 'createobject_UserInterface' ), 5 ); }The main concern here is that a ‘the_content’ script does not get called everywhere a ‘wp_enqueue_scripts’ hook gets called. The question is whether AJAX and REST calls run through here.
Did not work, broke a lot of features and setup in the plugin.
Candidates…
‘template_include’ hook may get called too often, but it is a classic filter that has been around for a while and should work for both block and legacy templates.
Seems to be working, needs more testing.

Location categories provides a way to place categories into groups that can be filtered via the administrative tools and on the front end user experience.
Managing categories is provided by the Power add on.
The underlying technology uses the built-in WordPress category management system. Some of the core functionality of adding, removing, and assigning categories is managed by WordPress and thus requires additional testing whenever WordPress posts a new release.
The Power add on extend this default functionality to provide custom administrative and user interactions with location categories.
WordPress 6+
Store Locator Plus 5.13+
Power Add On 5.11+
The use cases are based on the WordPress plugins. Most of the processes described within apply to the MySLP SaaS implementation as well.
WordPress environment is setup and configured including activation of the following plugins
In addition map service (Google API keys) should be in place and some locations should be added to the system.
A page has been created with the [slplus] shortcode present and the map is rendering properly.
Users are logged in as a WordPress administrator (the process will be slightly different for SaaS users).
Create a location category and attach it to an existing location.
The new category should appear on the category list on the page.

The category is assigned to the location and appears on the location table.

The search form for the map should show a category drop down.

Only the locations that match the search criteria, including the category filter, should be shown.


This looks like a problem with the AJAX processor on the backend. Need to look into ajax_onload.

The problem was with the Power add on trying to validate SLP location IDs when updating map markers. The intent is to NOT manipulate a map marker with an invalid ID as it can cause more problems downstream.
DO NOT check_admin_referer() for the AJAX calls. The easiest way to check that , since we do not have an easily-accessible reference variable for “hey, I’m running an AJAX query now” is to simply ensure the nonce we want to validate even exists in the first place.

SLP 5.13.5 prerelease + Power 5.11 has a problem found during testing… the admin add locations breaks (probably a lot of other things as well).
The browser console:

store-locator-le/include/module/admin_tabs/SLP_BaseClass_Admin.php
enqueue_admin_javascript()
This is called for each add-on that needs it…
Power needs it.handle: slppower_manage_locations
data stack:
{"ajax_nonce":"50164ddb77"}
SLP (base plugin) needs it.handle: slp_manage_locations
data stack:
{"ajax_nonce":"50164ddb77"}
However, a code search shows that ONLY the base plugin admin JavaScript is using/referencing wp_data…

This is always true:
if ( ! empty( $tab_js_settings ) ) {
Because this is always set further up in the code…
// All our JS will now have an AJAX_NONCE setting.
$tab_js_settings = array(         'ajax_nonce'        => wp_create_nonce('slp_ajax'),         );
They key player here “ajax_nonce” set above is ONLY ever used here… SLP base plugin admin.js… which is only called when doing a change_option. That is fired from both the base plugin and Power add on, HOWEVER… they both reference the SLP_ADMIN.change_option() method in JavaScript.


This will stop the default (only) ajax_nonce PHP array entry from being set, effectively short-circuiting the enqueue of the script from the Power add-on.
While this fixes the issue short-term and stops overloading the tab_js_settings, if Power (or any other add on) finds it necessary to add some custom entries to the tab_js_settings array, it will break again. This is a fragile patch.
The change…

The current setup is to hard-code the JS environment variable to “wp_data” for ALL add-ons. This will make them “fight” per the message above.
Instead of blindly referencing a generic hard-coded “wp_data” variable, let’s change that to be based on the add-on name.
For our use cases above that would do this.
For SLP base plugin wp_data => slp_data
For Power add on wp_data => slppower_data
The change…


Instead of manually detecting arrays then using array_map(), as noted below, instead use map_deep( $arrayOrScalarVar, ‘<method>’.
For example:
$cleanVar = map_deep( $_REQUEST['id'], 'santize_key');For wp_kses_post use wp_kses_post_deep(). See below for more info.
When processing an array of values use array_map( ‘<method>’ , $arrayVar).
For example array_map( ‘sanitize_key’ , (array) $_REQUEST[‘id’] ).
There is no need to call wp_unslash() before sanitizing inputs.
Strips out all characters that are not allowable in an email.
Lowercase alphanumeric characters, dashes, and underscores are allowed.
This function applies filters that can be hooked to perform specific sanitization procedures for the particular metadata type and key. Does not sanitize anything on its own. Custom filters must be hooked in to do the work. The filter hook tag has the form “sanitize_{$meta_type}_meta_{$meta_key}“.
Only sanitizes specific options known to WordPress (primarily for internal use).
After the value has been handled by the functions in the switch statement, it will be passed through a sanitize_option_$option filter.
From the WordPress docs…
< characters to entitiesThat means this CANNOT be used for anything that processes HTML elements.
/**
 * Sanitizes a string from user input or from the database.
 *
 * - Checks for invalid UTF-8,
 * - Converts single `<` characters to entities
 * - Strips all tags
 * - Removes line breaks, tabs, and extra whitespace
 * - Strips octets
 *
 * @param string $str String to sanitize.
 * @return string Sanitized string.
 */
function sanitize_text_field( $str ) {
	$filtered = _sanitize_text_fields( $str, false );

	/**
	 * Filters a sanitized text field string.
	 *
	 * @since 2.9.0
	 *
	 * @param string $filtered The sanitized string.
	 * @param string $str      The string prior to being sanitized.
	 */
	return apply_filters( 'sanitize_text_field', $filtered, $str );
}Like sanitize_text_field, but keeps newlines.
use esc_url_raw() – see below
Calls wp_kses() with the ‘post’ context that automatically allows all HTML that is permitted in post content.
ℹ️ Processing an array or object? Use wp_kses_post_deep().
In SLP it allows HTML tags like Vue, etc. that are on the allowed HTML tags filter.
The wp_kses methods call wp_normalize_entities which bastardizes nearly all (but not ALL) occurrences of & in a string to &.
That means wp_kses functions are basically useless for sanitizing query parameter strings.
 function wp_kses_post( $data ) {
    return wp_kses( $data, 'post' );
}Navigates through an array, object, or scalar, and sanitizes content for allowed HTML tags for post content.
function wp_kses_post_deep( $data ) {
    return map_deep( $data, 'wp_kses_post' );
}esc_attr()
Use on everything else that’s printed into an HTML element’s attribute.
esc_html()
Use anytime an HTML element encloses a section of data being displayed. This WILL NOT display HTML content, it is meant for being used inside HTML and will remove your HTML.
esc_js()
Use for inline Javascript.
esc_textarea() – Use this to encode text for use inside a textarea element.
Use on all URLs, including those in the src and href attributes of an HTML element.
Does encode things like & to wonky-ass WordPress HTML coded entities.
Use when storing a URL in the database or in other cases where non-encoded URLs are needed.
Does NOT encode things like & to wonky-ass WordPress HTML coded entities.
esc_xml() – Use to escape XML block.
wp_kses() – See Santize above for more details.
💙 wp_kses_post() – See Sanitize above for more details.
💙 wp_kses_post_deep() – See Sanitize above for more details.
wp_kses_data() – Alternative version of wp_kses() that allows only the HTML permitted in post comments.
wp_nonce_field( <action> , [ name = ‘_wpnonce’ ], [ referer = true ] , [ echo = true ])
– Add nonce input to a form.
check_admin_referer( <action> , [ name = ‘_wpnonce’ ])
– Check a received nonce is valid AND from an admin page.

WordPress does some odd things when it comes to managing the DOM elements, especially when it comes to JavaScript and CSS. WordPress has crafted their own creative PHP methodology for getting data from PHP into JavaScript when loading the scripts. This allows for JavaScript variables to be “pre-initialized” when the scripts are first rendered.
Useful for getting a known starting state in JavaScript based on PHP state and logic that has run up to the point that the scripts are loaded.
Not standard AT ALL given today’s single page app and other advanced methodologies just as REST queries, etc. that could do the same job.

Originally all of the SLP settings forms had to be submitted by clicking a save button. This runs a typical form post + full page render… old-school web 1.X style.
Along the way work was done to utilize JavaScript triggers and save data with an onBlur on settings form fields. The tech uses jQuery using an AJAX-type model to send a single form field to the WordPress AJAX processor to manage saving a single field without re-rendering the entire page or sending the entire form.
SLP base plugin’s admin.js initializes and hooks a change_option JS function to any INPUT type field with a quick_save CSS class attached.
    var qs_inputs = jQuery('.quick_save').find(':input');
    qs_inputs.on('change', function (e) {
      change_option(e.currentTarget);
    });
    qs_inputs.on('blur', function (e) {
      var start_val = e.currentTarget.defaultValue;
      if (e.currentTarget.value !== start_val) {
        change_option(e.currentTarget);
      }
    });