Since containers are ephemeral and each instance handles requests independently, sharing session data requires using a centralized session storage such as AWS ElastiCache.
ElastiCache can be configured for Valkey (open source Reddis) or Memcache. Valkey is lower cost.
Set up ElastiCache
- Create a Valkey server.
- Configure a publicly accessible or VPC-limited endpoint, depending on your ECS networking setup.
- Choose 3 subnets on same network as ECS containers
- Choose the ECS security group
Configure The Docker Image
Add the Redis extension to PHP and enable it in the php.ini configuration. This configuration uses environment variables so the Redis server can be configured with environment variables for each container instance.
Create The Host Image Builder PHP Ini File
Review the PHP Runtime Configuration page on session settings.
Create ./Docker/Images/Files/php/docker-php-ext-redis.ini
extension=redis.so
session.save_handler = ${PHP_SESSION_SAVE_HANDLER}
session.save_path = ${PHP_SESSION_SAVE_PATH}
Update The Host Dockerfile
Update the host Dockerfile to install Redis and the libs needed to support it. Copy the php ini file into conf.d so it is loaded when PHP starts. This example is from a WordPress 6 image running PHP 8 on Apache.
Create ./Docker/Images/Dockerfile
# -- base image

FROM public.ecr.aws/docker/library/wordpress:6.4.2-php8.3-apache
LABEL authors="lancecleveland" \
      image="WordPress Multisite on Apache"

# -- ports

EXPOSE 443

# -- os utilities

RUN set -eux; \
	apt-get update; \
	apt-get install -y --no-install-recommends \
		dnsutils \
        inetutils-traceroute \
        iputils-ping \
        libz-dev \
        libssl-dev \
        libmagickwand-dev \
	; \
	rm -rf \
        /var/lib/apt/lists/* \
	    /usr/src/wordpress/wp-content/themes/* \
	    /usr/src/wordpress/wp-content/plugins/* \
	    /usr/src/wordpress/wp-config-example.php \
    ;

# -- install Redis PHP extension
RUN pecl channel-update pecl.php.net \
    && pecl install redis \
    && docker-php-ext-enable redis

# -- PHP redis
COPY ./Files/php/docker-php-ext-redis.ini /usr/local/etc/php/conf.d/docker-php-ext-redis.ini

# -- apache rewrite

RUN a2enmod ssl && a2enmod rewrite; \
    mkdir -p /etc/apache2/ssl

# -- apache SSL

COPY ./Files/ssl/*.pem /etc/apache2/ssl/
COPY ./Files/apache/sites-available/*.conf /etc/apache2/sites-available/

# -- WordPress , gets copies to apache root /var/www/html
COPY ./Files/wordpress/ /usr/src/wordpress/

# -- php xdebug

RUN pecl channel-update pecl.php.net
RUN pecl install xdebug \
    && docker-php-ext-enable xdebug

# -- Standard WordPress Env Vars

ENV WORDPRESS_DB_USER="blah_blah_user"
ENV WORDPRESS_DB_NAME="blah_blah_database"
ENV WORDPRESS_TABLE_PREFIX="wp_"
ENV WORDPRESS_DB_CHARSET="utf8"
ENV WORDPRESS_DB_COLLATE=""
Configure The Docker Container
Update Docker Composer and ECS Task Definitions
Docker Composer is for local development container setup. ECS Task definitions are for AWS Cloud Elastic Container Services.
For our local Docker Composer configuration we use a docker-compose secrets file that is not committed to our repository for setting sensitive environment variables.
In this example the PHP_SESSION_* environment variables are read by the PHP startup and substituted in the session.* variables.
./Docker/Composers/Secrets/docker-compose-secrets.yml
This configuration uses local file based session storage. This is what you’d use on a typical single-server development file.
services:
  wp:
    environment:
      PHP_SESSION_SAVE_HANDLER: 'files'
      PHP_SESSION_SAVE_PATH: ''
For a PHP connection to a cluster, like we have on our AWS fault-tolerant container clusters you and fault-tolerant ElastiCache clusters you need to set something similar in the Task Definition environment variables using the same names as above.
      PHP_SESSION_SAVE_HANDLER: 'redis'
      PHP_SESSION_SAVE_PATH: 'tcp://blah-saas-staging.blah.blah.blah.amazonaws.com:6379?persistent=1&failover=1&timeout=2&read_timeout=2&serialize=php&cluster=redis'
Load Balancer Sticky Sessions Option
Configure your Application Load Balancer (or Elastic Load Balancer) to enable sticky sessions to reduce the need to share session data across containers. Sticky sessions ensure that a user is always directed to the same container instance during their session.
– Application Load Balancer: Enable Session Stickiness.
– Set a **duration-based stickiness** cookie to control how long the user remains connected to the same task/container.
**Note**: Sticky sessions are not ideal for auto-scaling environments or when maintaining container independence is critical, so this should complement, not replace, shared session storage.
Additional Considerations
1. **Security**:
– Encrypt session data in transit using TLS (especially when connecting to Redis or RDS).
– Ensure that only trusted ECS tasks and resources can access session storage by restricting permissions through IAM roles and security groups.
2. **Performance Tuning**:
– Cache session data effectively using low TTLs for Redis or Memcached.
– Monitor ElastiCache or RDS instance performance to prevent bottlenecks caused by session sharing.
3. **Scaling and Resilience**:
– Use multi-AZ configurations for Redis or RDS.
– Consider Redis Cluster for read/write scaling and high availability.
By offloading session management to centralized storage and using ECS best practices, your WordPress instances can efficiently share session information while scaling seamlessly.
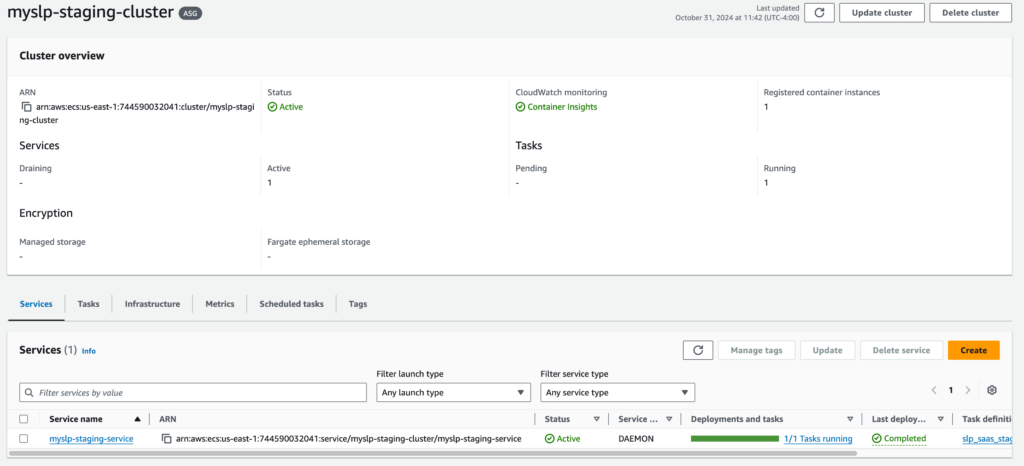
Tweaking The Configuration
The cluster is not working exactly as expected.
One container will connect and appears to work properly, but the user experience will swap form a logged in page to a not logged in page mid-session. The assumption is that this is due to the user connection jumping to a different server in the container cluster.
Attempted Resolution: Set PHP session.save_handler to rediscluster
On the staging server the initial php session_save handler (set via environment variable) was set to redis.
Changing this to rediscluster did not change the session switching behavior.
Attempted Resolution: Revise the PHP session_start() call
In WordPress the session_start() was moved from the prior invocation in the WordPress init() hook to the muplugins_loaded hook which loads earlier in the process. This did not seem to have an impact on the issue. Some minor updates to deal with configurations using a Redis Cluster and not were made as well as ensuring we check if a session was already started.
Our Redis Cluster code, invoked during muplugins_loaded with a MySLP_RedisCluster::get_instance() call.
<?php
defined( 'MYSLP_VERSION' ) || exit;


/**
 *
 */
class RedisClusterSessionHandler implements SessionHandlerInterface {
	private $redis;

	public function __construct() {
		$redisClusterEndpoint = get_cfg_var( 'session.save_path' );
		if ( empty( $redisClusterEndpoint ) ) {
			throw new RuntimeException( 'No Redis Cluster endpoint configured' );
		}


		// Parse and extract host/port (handle both single node and cluster)
		$parsedUrl = parse_url( $redisClusterEndpoint );
		$redisHost = $parsedUrl['host'] ?? 'localhost';
		$redisPort = $parsedUrl['port'] ?? 6379;

		// Use an array format required by RedisCluster
		$redisClusterNodes = [ "$redisHost:$redisPort" ];

		try {
			// Initialize RedisCluster
			$this->redis = new RedisCluster( null, $redisClusterNodes, 5, 5, true );
		} catch ( RedisClusterException $e ) {
			throw new RuntimeException( 'Failed to connect to Redis Cluster: ' . $e->getMessage() );
		}

	}

	/**
	 * Initialize session
	 * @link https://php.net/manual/en/sessionhandlerinterface.open.php
	 *
	 * @param $savePath
	 * @param $sessionName
	 *
	 * @return bool <p>
	 * The return value (usually TRUE on success, FALSE on failure).
	 * Note this value is returned internally to PHP for processing.
	 * </p>
	 * @since 5.4
	 */
	public function open( $savePath, $sessionName ): bool {
		return true; // No need to do anything here
	}

	/**
	 * Close the session
	 * @link https://php.net/manual/en/sessionhandlerinterface.close.php
	 * @return bool <p>
	 * The return value (usually TRUE on success, FALSE on failure).
	 * Note this value is returned internally to PHP for processing.
	 * </p>
	 * @since 5.4
	 */
	public function close(): bool {
		return true; // No need to close anything explicitly
	}

	/**
	 * Read session data
	 * @link https://php.net/manual/en/sessionhandlerinterface.read.php
	 *
	 * @param $sessionId
	 *
	 * @return string <p>
	 * Returns an encoded string of the read data.
	 * If nothing was read, it must return false.
	 * Note this value is returned internally to PHP for processing.
	 * </p>
	 * @since 5.4
	 */
	public function read( $sessionId ): string {
		$sessionData = $this->redis->get( "PHPREDIS_SESSION:$sessionId" );

		return $sessionData ?: ''; // Return session data or empty string if not found
	}

	/**
	 * Write session data
	 * @link https://php.net/manual/en/sessionhandlerinterface.write.php
	 *
	 * @param $sessionId
	 * @param string $data <p>
	 * The encoded session data. This data is the
	 * result of the PHP internally encoding
	 * the $_SESSION superglobal to a serialized
	 * string and passing it as this parameter.
	 * Please note sessions use an alternative serialization method.
	 * </p>
	 *
	 * @return bool <p>
	 * The return value (usually TRUE on success, FALSE on failure).
	 * Note this value is returned internally to PHP for processing.
	 * </p>
	 * @since 5.4
	 */
	public function write( $sessionId, $data ): bool {
		return $this->redis->setex( "PHPREDIS_SESSION:$sessionId", 3600, $data ); // 1-hour TTL
	}

	/**
	 * Destroy a session
	 * @link https://php.net/manual/en/sessionhandlerinterface.destroy.php
	 *
	 * @param $sessionId
	 *
	 * @return bool <p>
	 * The return value (usually TRUE on success, FALSE on failure).
	 * Note this value is returned internally to PHP for processing.
	 * </p>
	 * @since 5.4
	 */
	public function destroy( $sessionId ): bool {
		return $this->redis->del( [ "PHPREDIS_SESSION:$sessionId" ] ) > 0;
	}

	/**
	 * Cleanup old sessions
	 * @link https://php.net/manual/en/sessionhandlerinterface.gc.php
	 *
	 * @param $maxLifetime
	 *
	 * @return int|false <p>
	 * Returns the number of deleted sessions on success, or false on failure. Prior to PHP version 7.1, the function returned true on success.
	 * Note this value is returned internally to PHP for processing.
	 * </p>
	 * @since 5.4
	 */
	public function gc( $maxLifetime ): int|false {
		return true; // Redis handles expiration via TTL, so no need to do anything
	}
}

/**
 *
 */
class MySLP_RedisCluster extends MySLP_Base {
	private $redis;

	/**
	 * Catch cluster redirects (MOVED) using the built-in PHP RedisCluster lib
	 * @return void
	 * @throws RedisClusterException
	 */
	final function initialize() {
		$redisClusterEndpoint = get_cfg_var( 'session.save_path' );
		if ( class_exists( 'RedisCluster' ) && ! empty( $redisClusterEndpoint ) ) {
			try {
				$handler = new RedisClusterSessionHandler();
				session_set_save_handler( $handler, true );

			} catch ( RuntimeException $e ) {
				error_log( 'Error initializing RedisClusterSessionHandler: ' . $e->getMessage() );
			}
		}
		if ( ! session_id() && ! headers_sent() ) {
			session_start();
		}
	}
}
SaaS WP Login Processing
- wp-login.php
- $reauth = empty( $_REQUEST[‘reauth’] ) ? false : true; is set to false.
- $user = wp_signon( array() , $secure_cookie “” )
- do_action( ‘wp_login’ , $user->user_login “lcleveland” , $user “WP_User” is set)
- if ( empty( $_COOKIE[ LOGGED_IN_COOKIE ] )) is NOT empty
- LOGGED_IN_COOKIE is something like “wordpress_logged_in_e2ec4afff4940eebb6cd200cc8206825”
which IS set on this session
- $requested_redirect_to ==> ‘https://staging.storelocatorplus.com/wp-admin/”
as set in $_REQUEST[‘redirect_to’]
- if ( ! is_wp_error( $user ) && ! $reauth ) { // This is executing because user is set and reauth is not set.
Need to set the WP Secrets the same (keys and salts) on ALL nodes in the cluster that share login. The auth (login) cookies have salt and keys in them and with each server generating their own they will not be validated.
Docker has a method to pass these in via an ENV setting.
Image by Robert from Pixabay